
The Anatomy of the Machine:
Not as complicated as you think
You ever called in for troubleshooting and the person over the phone tries their best to help, but you can't picture what they're talking about? This makes things super-difficult for both of you.
Say you're calling in because your thread keeps coming un-threaded. The first question we usually ask is:
" Is the thread it the take-up lever? "
Of course, the response we get from newer sewers is usually--
" Huh? "
Not being able to see someone point directly at the thing in question is very inconvenient.
Not being able to see someone point directly at the thing in question is very inconvenient.
Most people when they try to identify parts and pieces of a sewing machine see something along the lines of this:
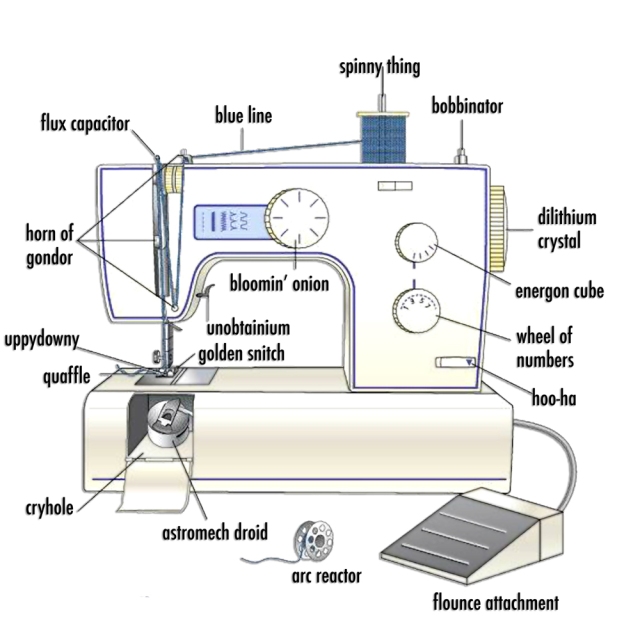
Hopefully we can help clear up some of the confusion, whether you’re still learning the basics or just can’t grasp the words to explain an issue due to frustration.
Firstly, you can liken sewing machines to a car - from different brands to different models, the style and special features may vary despite being used for the same function.
Firstly, you can liken sewing machines to a car - from different brands to different models, the style and special features may vary despite being used for the same function.
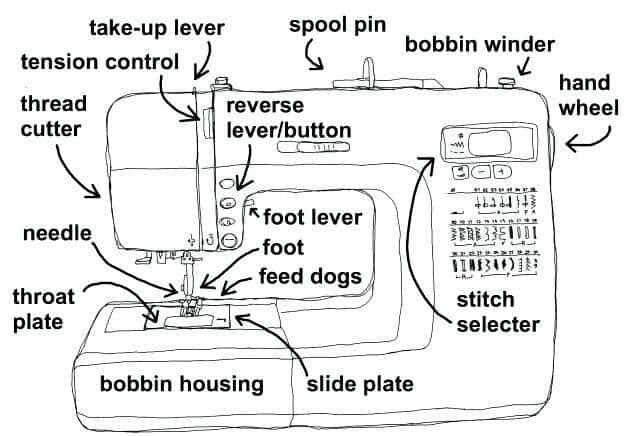
However, just like a car, they all have some of the same basic features, even if they might look slightly different from machine to machine. We've included a very basic mechanical and computerized model example below.
 |
 |
Your machine may differ from the ones pictured, if you have a machine with multiple special or enhanced features or an older model
that may not have all of the features above in these exact spots, you can refer to your machine manual to help you identify the features on your machine.
Of course, knowing what the parts are and knowing what they do aren't the same thing, so without further ado:
that may not have all of the features above in these exact spots, you can refer to your machine manual to help you identify the features on your machine.
Of course, knowing what the parts are and knowing what they do aren't the same thing, so without further ado:
- Power Switch – For safety, the power should always be turned off when threading your machine or cleaning.
- Handwheel (Balancewheel) - The handwheel is a large dial that is located on the right side of the machine, which makes the needle go up and down. Always turn the hand wheel towards yourself. Turning it the other way may disturb your machine’s timing or cause jams.
- Reverse Lever/Button – The backstitch or reverse stitch controller can be in the form of a little lever, or a button. When you’re pressing on it, the machine will sew backward.
- Presser Foot Lifter – The presser foot lifter is used for raising or lowering the presser foot. It’s usually located to the right of the needle or towards the back, and it’s a small plastic or metal lever. Always raise the presser foot before you thread your machine, and lower it into place before you start sewing.
- Presser Foot– The presser foot sits on top of the fabric to keep it flat while the Feed Dogs underneath gently move the fabric under the foot. There are a ton of different styles of presser feet designed for specific tasks or materials, such as a zipper foot, a buttonhole foot, an edge stitching foot, or a teflon foot.
- Feed Dogs – Feed dogs sit directly under the presser foot and peek out of a rectangular cut-out in the needle plate. They have bumpy, ridged “teeth” that grabs the fabric and helps it move back as the needle is going up and down. Make sure you clean between the feed dogs using a brush. If there’s too much lint stuck in them the fabric may not feed through the machine smoothly.
- Needle Threader– This is a convenient feature on many machines allowing you to easily thread the needle. It’s especially useful for thinner threads which may be harder to see to thread by hand. Always be sure to have the needle in the highest position before using the needle threader.
- Needle Clamp – A small screw which holds the needle in place. Never overtighten as it will strip the screw threads.
- Throat/Stitch/Needle Plate – The needle plate is a flat, often metal piece located under the machine’s needle and presser foot. The needle goes through a small opening in the needle plate to draw up the bobbin thread below.
- Workspace – The workspace is generally the amount of space located to the right of the needle.
- Extension Tray/Table – A removable accessory tray usually comes already standard with your machine. If you are unboxing for the first time and going through all your parts and pieces, please be sure to check your accessory box for small parts like feet and tools! A removeable extension table ( not available with all machines ) or accessory tray gives you the ability to do free arm sewing, such as shirt cuffs, waistbands, pant legs, etc. (example pictured below - may slightly differ in appearance depending on brand)


- Tension Control – There are times when the thread tension will need to be adjusted. For example on very thick or multi layered projects, lowering the tension will help keep consistent stitches.
- Take-Up Lever – (The part that goes up and down while you sew) This part pulls the thread from the spool, and feeds it to the machine. This is commonly overlooked when threading. Always be sure to have the needle in the highest position which will bring the Take-Up Lever into view.
- Thread Guide – This allows the upper thread to feed smoothly from the spool.
- Stitch Selector –
- Mechanical Machine: Also known as the pattern selector dial, turn this dial to select a desired stitch pattern.
- Computerized Machine: Functions the same, however you will use either buttons or if your model has a touch screen, the touch screen to select your stitch pattern.
- Stitch Length Dial –
- Mechanical Machine: Turn this dial to increase or decrease the stitch length. The higher the number the longer the stitch.
- Computerized Machine: Functions the same, however you will use either buttons or if your model has a touch screen, the touch screen to change your stitch length.
- Spool Pin – At the very top of your machine is the spool pin, it will either be vertical or horizontal. The spool pin allows the thread to feed smoothly and consistently. If your sewing machine has a horizontal spool pin or your spool is wobbly when being used, you’ll need to use a spool cap to hold your thread in place. The spool cap will look like a disk with a hole in the center.
- Bobbin Winder-
- Bobbin Winder Pin : Attach an empty bobbin here to begin winding the bobbin.
- Bobbin Winder Stop: Push towards bobbin to engage. When the bobbin has been completely wound it will automatically stop by the pressure exerted from the bobbin winder stopper.
- Foot Control/Foot Pedal – This works just like a pedal in a car! Just push and it will start to sew; the harder you press the faster it will go. *Some machines have a two-in-one power cord/foot pedal combo*
- Knee lifter – ( Not Included will all machines, example pictured below - may slightly differ in appearance depending on brand) This handy addition that can lift and lower the presser foot by pushing against it with your knee or thigh.

CATEGORIES
CONTACT US
- Ph: (251) 634-3133
- Email: info@allaboutsewinginc.com
- Address: 590 Schillinger Rd S Ste D
- Mobile, AL 36695
- Hours: Mon-Tue: 9am - 5pm
- Wed: 9am - 1pm
- Thurs-Fri: 9am - 5pm
- Sat 9am - 1pm
- *Closed Sunday